Thursday 30 July 2020

Sharp Practice: The Bettys Barney

Given the popularity of Sharp Practice down BIG I've been meaning to get a few games in so it all sticks in my head(!)  Luckily Andy has just raised some AWI Redcoats and he was up for getting them blooded and helping me get a grasp of the rules. Andy suggested we play the Escort Duty scenario with the British trying to escort the traitorous spy Joseph Bettys across the board to safety, only to find a Rebel force blocking their route!

The first token drawn was Blue 2 which saw Lieutenant Kraslow and two units of Maryland State Line enter the field...


Next up came Sergeant Rowsick and a group of Continental Light Infantry skirmishers, using a Mobile Deployment Point (here shown by a young local woman who pointed out a hidden path through some woods). I did make a mistake with the Light Infantry using the stat line for rifles and not equipping them with muskets as the force list shows. Sorry Andy! :-(


The first redcoats were then spotted, Sergeant Strange and his Light Infantry skirmishers who quickly hid behind a building!


Next up two units of British Light Infantry in Line led by Ensign Masters enter the field of battle. The best troops in the British force they proceed straight down the road towards the Rebels...


Coming under fire from the Continental Lights who inflicted some Shock on the advancing British...


Captain Symonds was next to enter the fray with two units of British Regulars escorting the spy Joe Bettys!


A support unit of Continental Light Dragoons then arrived. These didn't have a leader attached which was to cause me problems later as I failed to keep them within command range of any of my Leaders.


Finally Captain Pollack arrived with three groups of Continental Line, capable of going toe-to-toe with British Line, deploying from the Mobile Deployment Point between the wood and road.


Sergeant Strange's Lights engaged the Continental skirmishers...


Inflicting a point of Shock on them.


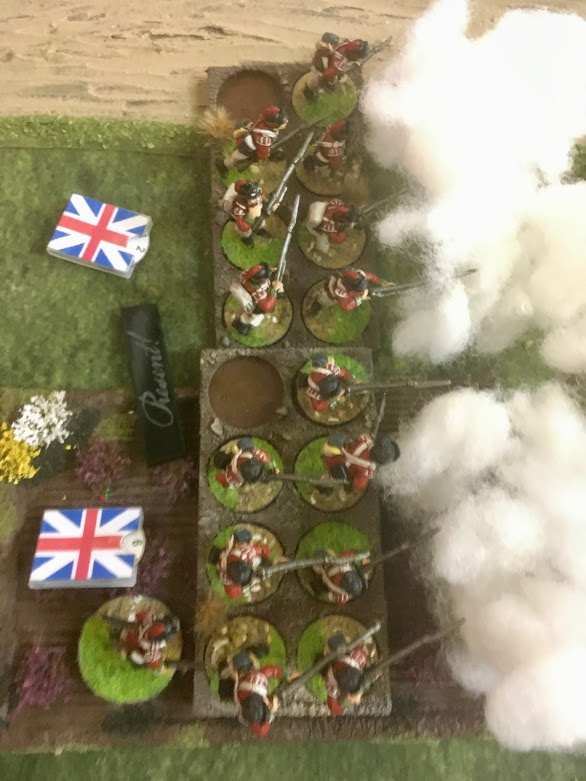
Meanwhile Captain Pollack ordered his Continentals into Line and to Present their muskets towards the enemy, whilst the State Militia moved off the road to cover the flank which the British Line under Captain Simmonds were moving towards.


Ensign Masters' Light Infantry open fire at the Continental forces...


Inflicting Shock on two units of Continental Line and the Continental Light Dragoons.


The Gods of War(gaming) were with me tonight however as the chips provided me with Four Command Cards allowing me a bonus activation round so the Continental Line who having already Presented their muskets fired a First Fire volley at the British Light Infantry before swiftly reloading...


This inflicted Shock and a casualty on the British and with just two tokens left in the bag (my Level 3 leader Captain Pollack and Tiffin) I was fortunate that my Level 3 came out allowing them to Present and Fire again!

Two rounds of Continental volley fire hammered the British Lights, killing two and several points of Shock.


Pushed back both Groups of Light Infantry broke and ran swiftly towards safety! The British Force Morale took a beating this turn.


Meanwhile the Continental Skirmishers managed to kill the British Light Skirmishers Sergeant leaving them leaderless...


Within the Command range of Captain Pollack the Light Dragoons were ordered to Charge down the remaining British Lights who attempted to evade but failed. 

Retreating Skirmishers against Charging Impact Cavalry, the result was not in doubt...


...except for my awful dice rolling! 

Needing fives and sixes out of a handful of dice I managed to only kill one and inflict another point of Shock! Shocking indeed!


The British Light then began shooting up the leaderless Dragoons inflicting two casualties and forcing them to retreat, negatively impacting the American Force Morale.

Meanwhile on the American right flank, Captain Simmond's Line escorting the spy Bettys, charged into Lieutenant Kraslow's State Line  who foolishly had not reloaded their muskets.


Unsurprisingly (well to me at least) a savage bayoneting saw the Marylanders lose several men, pick up a pile of Shock and see Lieutenant Kraslow knocked out! Breaking, the American Force Morale suddenly plummeted losing them two Command cards.


However in the melee the State Line managed to inflict one casualty on the British. As this was Captain Simmonds group Andy had to role to see if his Leader or the Spy was the casualty. He rolled a one, it was one of them. He then rolled to see if Simmonds was dead or the spy... 

It was the spy! The escort mission had failed!


We decided to continue the battle to see if the British Line could reach the safety of the table edge... Captain Pollack broke up his Continental Line formation to try and shoot the British in the flank. 

Would the British get to move first before the Americans could reload and fire?


Yes they could, however Sergeant Rowsick's Continental Lights started shooting at their rear inflicting Double Shock!


Really needing Tiffin and a new activation for Captain Simmonds next, unfortunately for Andy, Captain Pollack and his Continental Line activated next, the two groups loading and firing into the rear of the British killing two and piling Shock on.


Faced with annihilation, Andy conceded at this point...

An enjoyable game, I am beginning to get my head around the nuances of Sharp Practice and its differences with Rebels & Patriots. We subsequently realised the units points costs in the rulebook are wrong and this coupled with my accidental upgrading of my Lights with the longer range muskets meant I should not have had the Dragoon support - that said they weren't as useful as they should have been!

I'm looking forward to trying the rules again soon, maybe seeing how my usually useless Militia fare under a different set of rules!

Wednesday 29 July 2020

The Men Who Would Be Kings: Who Can Sternly Die When Hope Is Done?

With the relaxation of the lockdown restrictions in England, BIG has reopened for some gaming, although with social distancing protocols in place and lots of hand sanitizer on hand! Unfortunately George is largely working from home not in Bristol, but a trip to the office led to an opportunity to dust off the toy soldiers and get a game in!


As he has painted some camels for his Dervishes (above) we decided to revisit the Sudan with The Men Who Would Be Kings and the Run To The Hills scenario with a retreating Imperial force attempting to cross hostile territory in an attempt to reach safety and tiffin!


Turn one saw something amazing happen that had never happened before in a TMWWBK game - every unit in the British Field Force obeyed the order to Advance!


The Bazingers soon saw the enemy appear on their flank as three Rubs of Dervishes appeared out of the desert dust (one just off camera...)


The Bengal Lancers charged in to support their native allies, whilst the 2/66th Foot moved up in support...


In one turn the Lancers wiped out an enemy Rub having followed up their initial charge to excellent effect. Sixteen Dervishes down for the loss of two brave Lancers!


Unfortunately another unit of Dervishes then charged the Lancers inflicting two more casualties before being driven back whilst more Dervishes charged the Bazingers killing half of them and Pinning them.


The remaining Lancers in a Death or Glory charge attacked the Bazingers foe, and whilst every brave lancer fell, they inflicted enough casualties on the enemy to Pin them. Demoralised by their losses this unit of Dervishes failed to rally during the battle...

On the other flank two units of Mahdist rifles started taking pot shots at the Sikhs and Highlanders with limited but occasional effect.


At this stage the battle was going well for the British with two units of Dervishes effectively taken out and still having four units of Regular Line and half a unit of Irregulars...


The sole remaining Dervish Rub who had survived the Lancers charges, decided themselves to attempt to Charge the 2/66th but failed to get into contact and were left staring down the barrels of 12 Martini-Henrys!


The fickle fortunes of war however soon saw defeat snatched from the jaws of victory! A pathetic volley of dice saw just two Dervish fall to the British gun-fire and the next turn the natives hit the British line killing three-quarters of the 2/66th in one round of combat!


Meanwhile elsewhere the Dervish managed to get their cannon into position to fire at the Imperialist invaders...


Though George's new Camel Cavalry kept refusing orders to advance into combat!


As the sun began to set, the Sikhs and Highlanders prepared to face the Mahdist foe...


Native riflemen falling to the disciplined fire of the Highlanders who were shooting into the setting sun!


Faced with two advancing units of Mahdists, the 15th Sikhs stood proud, ready to put enemy to the bayonet!


A crack of artillery fire and a shell landed amongst their ranks killing one brave son of the Punjab and causing the others to falter and become Pinned!


The Mahdist River Arabs took advantage and charged in killing four more of the Sikhs, who being Pinned could only fight at half effectiveness...


Another round of melee and the Sikhs died to a man...


Suddenly exposed the 92nd Highlanders fired at the advancing Mahdists...


And whilst they held off the River Arabs, a Rub of Fanatic Dervishes charged in...


Killing all but three of the Highlanders and Pinning them!


From looking favourable a couple of turns earlier, the battlefield had now swung against the British with three units of Regulars being effectively wiped out in quick succession...


The Camel Cavalry having spent most of the game refusing to advance, scented blood and glory and charged the three Pinned Highlanders wiping them out...


Whilst the remaining 2/66th then came under attack from the Dervishes who had attacked the Highlanders and were wiped out as well...


In a last flurry of defiance the Bazingers Rallied and managed to inflict casualties on the Mahdists who had caused them grief earlier and Pinned them.


Respite was short though with the Mahdists who beat the 92nd and wiped out the 2/66th crashing into the native Irregulars and putting them to the sword...


With just the 1/66th left isolated (and badly positioned) I conceded the battle.

Well that ebbed and flowed! With the Lancers having taken out two units of Dervishes and with the third coming up short in a Charge I thought the Gods of War(gaming) were with me, but the failure of the 2/66th to fire to any meaningful effect with the enemy under their guns was the turning point. The battle may have been rescuable if the 15th Sikhs had not become Pinned having suffered just one casualty as they can match the Mahdists on a one to one basis in combat, but they did not get the chance to.

Overall an enjoyable game, it was good to roll dice and push toy soldiers around again, and the amount of dead Dervishes testament to a hard fought victory for the Mahdi!