Saturday, 10 November 2018

The Men Who Would Be Kings: Blow The Bugle, Draw The Sword...

For our latest adventure with The Men Who Would Be Kings George brought along his new native army - Afghans! So now not just some fanatical guys with slashy swords (instead of stabby sticks) trying to kill the sons of Empire, but a whole load of ones with guns!

His army is a mix of old Foundry, Perry, Artizan and Studio and whilst there is some size difference they mix together really well and even in their currently undercoated state look really nice en masse...

We decided to play the 'A Sigh of Relief' scenario that we'd played previously in the Sudan. As we had found it be a tad unbalanced so we decided to play length ways (otherwise the central forces would be in rifle range immediately) and allow the Afghan relief forces to start rolling for arrival from turn one not two.

Again we played 36 points, George starting with 16 points in the centre with the captured 66th Foot's mascot Bobby! We used the terrain rules from Principles of War and somehow managed to generate the flattest area of the North West Frontier with some rough ground, farmland and forests but no mountains or hills!


The game did not get off to an auspicious start for the British Field Force with half of the units refusing orders to advance on turn one!


A couple of turns in I had managed to get most of my guys to move up, although Amir George's relief party was also moving up the table and I forgot that Afghans had rifles and lost one of my Sikhs!


My attempt to return fire was pathetic - this was one roll of 12 dice attempting hits on a 5 or 6 at long range... Needing two hits to cause one casualty George insisted I take a photo!


As I was failing at my dice rolls, Amir George was not and now all his reinforcements were on the table...


Next turn the 2/66th opened up on Bobby the dog's nefarious kidnappers, killing three and Pinning them. They failed a Rally test and retreated three inches (something they continued to do all game).


My dice rolling subsequently improved and I managed to Pin four of Amir George's units in one turn.


Amir George's dice rolling was now not so good and his Ghazis guarding Bobby rolled 2 on a Rallly test and routed!


Things got worse for Amir George next turn as the other Pinned Irregular Infantry who had kidnapped Bobby also routed. Suddenly no one was guarding the objective!


The 1/66th moved up to try and help form a bulwark against the advancing Agfhan relief force but walked into a mass of fire from the Tribsemen, lost three soldiers and were pinned with a unit of Ghazi Fanatic Tribal Infantry advancing towards them.


The 2/66th move through the 1/66th to protect them form the advancing Afghans and the 15th Sikhs advanced to rescue Bobby!


Technically this fulfilled the scenario objective, but as the bulk of the Afghan force had not got anywhere near the fighting we decided to continue the game to see if the British could successfully get Bobby to safety off their table edge.


Amir George immediately took advantage of this extension by charging a unit of his Ghazi fanatics into the Sikhs...


Killing all but two!


Elsewhere Amir George shot at the 2/66th causing one casualty. Incredibly they failed the Pin test and he then charged his other unit of Ghazis in!


Wiping out most of the 2/66th and forcing them back...


The rest of the British Field Force then swung into action. The 92nd (Gordon Highlanders) who were in Close Order fired a devastating close range volley at the Ghazis who had attacked the Sikhs, almost completely wiping them out...


The 3/66th (also in Close Order) similarly fired a volley at the other Ghazi unit killing a large number of them and some Herat mercenary Irregular guides (looking somewhat like Bazingers...) attached to the British force joined in the firing, resulting in the 18 man unit having just 3 left standing at the end of the turn.


Next turn another volley from the Gordons took out the remaining Ghazis who had attacked the Sikhs and after several turns failing Pin tests and retreating the unit of Irregular Rifles Pinned right at the start of the game failed again and Routed.

With three Ghazis and just two units of Irregular Infantry facing two British infantry units in Close Order and several others at varying degrees of reduced strength, Amir George decided discretion was the better part of valour and conceded victory to the British...


A good game which could well have turned out differently if the terrain generation had not resulted in a very atypical North-West Frontier table.

The scenario does work better played lengthways - it can be played starting on either long or short edges but if the Attacker enters from the long edge they can either reach the centre of the table or fire at the enemy there before the relief force gets out of bed. Having the attackers try and retreat to safety after rescuing the objective I think also improves it...

A couple of other tweaks might be to have the objective able to be moved on a Move order away from the Attacker or the Defender's relief force randomly appear from any table side on their half of the table not the opposite to where the Attacker comes on.

Playing against the Afghans was interesting and on a couple of occasions I forgot they were better shots than the Sudanese and lost troops I shouldn't have. This wasn't a major problem this time, but in the future is something I need to remember...

Next week we intend to try the 'Take The High Road' scenario again back in the Sudan with the Mahdists trying to seize the hill guarded by a smaller British force. Don't mention Isandlwana...


Sunday, 4 November 2018

The Men Who Would Be Kings: While Their Bayonets Shone Bright...

Apologies for the lateness of the report of this week's stramash in the Sudan against George and his Mahdists, real life and all that...

We decided to try the Take The High Road scenario from The Men Who Would Be Kings, with my gallant British Field Force attacking and George's Beja stabby guys defending. The scenario is based on 24 points v 18, so we upped that to 36 v 27. Once again we used the Principles of War terrain rules which saw George place two oasis and hill in front of my deployment line and me some rough ground off to one side.

The objective of the scenario was to seize a hill within 12 turns. As I had lots of guns and George not very many we both thought this would be a walk in the park for the British.

Unfortunately it did not work out that way...


As you can see, George decided to mitigate my firepower advantage by hiding the bulk of his force behind the hill. As Attacker I would be going first each turn so he had an advantage in the last moves would be by his force - if they were able to!

The British Field Force slowly moved down the table with the 1/66th, 92nd (Gordon Highlanders) and 15th Bengal Native Infantry (Ludhiana Sikhs) all refusing to move at one point or the other much to my chagrin wasting the limited turns available.

George sat and drank his tea and checked his emails (for the first six turns!).


My "cunning plan" was to advance down the battlefield flank and hit the hiding guys with stabby sticks in the flank. I threw two units down the other side in the hope George might be tempted to ally forth and attack them (under the Victory Conditions, whilst he would get 2VP for destroying two units - if he did - the hill gave 5VP).

As I neared the hill my troops encountered some Mahdist Irregular Infantry in some rough ground. The 92nd opened fire killing just one.


Next turn the 3/66th and 15th Sikhs got within range and opened fire inflicting some more casualties...


I have to confess that, given their impact in previous games (I am sure George has equipped them with Dragunov sniper rifles!), I was slightly fixated with pinning or destroying his only firearm equipped troops and probably spent a turn too long trying to get rid of them with four units shooting at them!

The Bazingers eventually finished them off, but by turn 8 the bulk of George's army was still safely protected by the hill! (1-0 to Steve)


With four turns left, the battlefield looked like this... I needed to move my guys quickly up and start firing into the mass of natives hiding behind the hill.


As George has not taken the bait on the right flank I decided to move the 3/66th up to Beja charge range, with the Highlanders of the 92nd protecting their flank. Unfortunately the 15th Sikhs (again) refused to move up the flank allowing them to fire into the flank of the Beja.


Having finished his tea, read his emails and checked out a neighbouring game of Bolt Action, George decided he needed to roll a few dice so charged one unit of Beja over the hill into the advancing 3/66th...


A flurry of bayonets and stabby sticks saw casualties on both sides but the bulk of the 3/66th lay dead and bleeding...


Next turn the Beja followed up their attack wiping out the remnants of the 3/66th out (score now 1-1)


The 92nd them opened up on the victorious Beja killing all but one...


Then the Bazingers skirmished forward, finishing off the Beja (2-1 to Steve) and gaining a foothold on the objective!

As you can also see the 1/66th and 2/66th on the right had been firing away of one of the Beja units from their flank and the Sikhs had some success shooting up and pinning another unit.


To make matters worse for George all his units within 12 inches of the destroyed Beja had to take a Pinning test and two failed.

However turn 11 saw him Rally ALL his Pinned units and advance one unit of River Arabs onto the hill...


As the game entered its final turn I only had one chance of securing victory. I had to blow away the River Arabs on the hill and hope their destruction would cause George's remaining Beja to Pin...


Unfortunately this Hail Mary didn't come off, whilst I inflicted some more casualties on the River Arabs and the Black Flag Beja, it wasn't enough and George was subsequently able to charge one unit of Beja into the Bazingers forcing them off the hill and advanced another into the hill.


The game ended with George in charge of the objective, winning the scenario 6 VP to 2.

This was something of a strange game with George having little for do for 2/3 of the game! (We both discussed his options at the start of the game and agreed hiding behind the hill was the best one).

Things may have gone my way if some of the Mahdists had failed their pinning rolls on Turn 11 as this would have prevented them moving on Turn 12 but c'est la vie, in retrospect I should have spent less time worrying about the Irregular Infantry rifles and moved by force up the flanks quicker.

I've offered to replay the scenario with the British defending the hill but I'm not sure Goerge likes the idea of his Mahdists advancing onto a line of Martini-Henry's... though I did say it would probably be just like Isandlwana given my track history! :-)

Sunday, 28 October 2018

Give Me Liberty, Or Give Me Death!

The news that Osprey will be releasing their latest Dan Mersey rules Rebels and Patriots in the new year has piqued my interest.

The rules will apparently cover small North American battles (similar in size to The Men Who Would Be Kings from the French Indian Wars through to the American Civil War.

I have to confess I am pretty much game for any American war from this hundred odd years, they all have some appeal, but having had a chat with George the other week the Revolutionary War appealed most to him so I said I was happy to raise a small army for that.

As he already had a box of Perry AWI British infantry I have agreed to go American which is ok with me as there is no lace to paint and I don't like tea! :-)

Having read a couple of playtest AAR reports, it looks like unit size is pretty much as per previous Mersey rules, regular/militia infantry 12 figures a unit, skirmishers and cavalry 6 and (possibly) Native American warbands at 16 (not 100% sure about this), so a box of Perry Continental infantry will give me the bulk of a 24 point army.

One thing that has always appealed to me with the war is the campaign weary look of the American troops and I have dug out an old Military Modelling Christmas special that included an article by the late Rick Scollins on the Battle of Guilford Courthouse and some wonderful artwork by him of campaign weary British and American troops.


I think this is a look I can achieve with some liberal use of dip so for Rebels and Patriots I think my brave revolutionaries will be based around Major General Nathanael Greene's army that fought Cornwallis on March 15th 1781...


Friday, 26 October 2018

The Men Who Would Be Kings: Play Up! And Play The Game!

Having been in France earlier in the week, my regular excursion into the Sudan with George was pushed back to last night. We decided to try the Seek and Destroy mission we played back in August again with the British tasked with destroying a Mahdist village in 12 turns, this time we would use 36 point Field Forces and I had a cannon! :-)


The game started with my Field Force deployed to attack the lightly defended village with George's stabby spear armed guys rushing up to reinforce the village.

My artillery opened up causing 3 points of damage to the first building, whilst the 92nd Highlanders 66th Foot and 15th Sikhs all advanced towards the village.  The Bazingers (out of shot to the left) decided to ignore orders to advance!


On turn two my cannon failed their order to fire which was frustrating, as was the failed command rolls attempting to get the 1/66th and 15th Sikhs into Close Order. The Bazingers again refused to advance!


To add insult to injury George's Irregular Infantry rifles in the village fired at long range at the 1/66th and killed one of the brave Englishmen...

Next turn the 2/66th opened up on the Irregulars inflicting several casualties and Pinning them, the 92nd opened fire on the Beja in the neighbouring building killing one, the Bazingers moved forward(!) and the cannon fired causing a further 5 points of damage to the enemy building. The 15th Sikhs again refused to form Close Order!


Another turn and the artillery brought down the first building, destroying the unit of Irregulars within.  The 1/66th then formed Close Order and the 2/66th and 92nd concentrated their fire on the Beja in the second building, Pinning them and subsequently seeing them Retreat after a failed Rally roll.

At this stage I was feeling reasonably confident, although once again the 15th Sikhs refused the form Close Order which with half the Mahdist army advancing on them was somewhat concerning...


With his reinforcements advancing swiftly up the table, George decided to launch one of his Beja units who had been hiding in some rough terrain at the Sikhs. Unfortunately his dice roll didn't go his way and they ended up short of their target and next turn came under fire from the 15th Sikhs, 1/66th and Bazingers, killing 11 and pinning them.


However the respite for the Sikhs was short as the main block of Beja rushed into contact! A fierce and bloody melee ensued and the noble Fierce Sikhs fought off the attacking stabby spear armed natives but lost five men doing so.

Elsewhere the cannon kept chipping away at building number two though the 92nd Highlanders now decided that they wanted a rest and refused orders to advance on the village (my calling them Jacobite sympathisers at this stage may not have helped!)


Again the Sikhs came under attack and despite once again proving quite vicious with the bayonet, the odds were heavily stacked against them and they were wiped out...


Next turn though the 1/66th and Bazingers gained a measure of revenge mauling two units of Beja and River Arab Tribal Infantry (after the initial problems of getting them to move, the Bazingers proved surprisingly valuable as riflemen, inflicting a lot of casualties on the Mahdists though the game).

Elsewhere the cannon took down building two and the 2/66th pinned the remaining Irregular Infantry who had tried to skirmish out of cover towards the hill that was blocking them shooting at the Bazingers.


With my brave lads punching holes in the Mahdists and George having some abysmal dice rolls (the Pinned Beja in the village rolled 2 on a Rally roll and routed) I had what can only be described as a "blonde moment" (I put it down to jet lag) and did something that turned the game (not that I noticed at the time!) - I advanced the 2/66th!

The brave Bazingers then beat off an attack by the remnants of one of the Beja units...


...and the 1/66th wiped them out next turn.

My mistake in advancing the 2/66th to pursue the enemy rifles was that it took them across the line of fire of the cannon, meaning that for the final three turns of the game it could not attempt to fire at the remaining buildings in the village.

This would not have been an issue if the 92nd had not once again refused to advance. If they had, they would have been able to smash down a building or two with 12 dice hitting on 4, 5 or 5 and needing to cause 10 points of damage...


As we entered the final turn this was the position. Almost all the Mahdists had been wiped out and part from the Sikhs and a few Bazingers, British casualties were remarkably light. Even the Highlanders had started to advance...


However...

Once again I had lost track of the victory conditions, all the more frustrating as I had victory in my grasp and threw it away.

I had destroyed two buildings at 3 VP a pieces, George had three buildings remaining at 2 VP a piece AND he had destroyed a unit of mine giving him an additional 2 VP and handing him victory (I gained no VP for destroying his units in this game as my focus was supposed to be razing the village).

A fun game and by and large I think my tactics would have worked and if not for the school boy error in advancing the 2/66th when I need not have bothered, I probably would have destroyed at least one more building securing victory for Her Majesty. Ho hum!

When setting up the game we decided to try the terrain deployment rules from Principles of War and these worked quite well, the rough ground slowing the advance of the 1/66th and the hill blocking line of site impacting both side. Incidentally the blue river represents a wadi as we couldn't find something more suitable last night, and making some suitable terrain for wadis etc is now high on the 'To Do" list!


Thursday, 25 October 2018

North-West Frontier: 92nd (Gordon Highlanders)

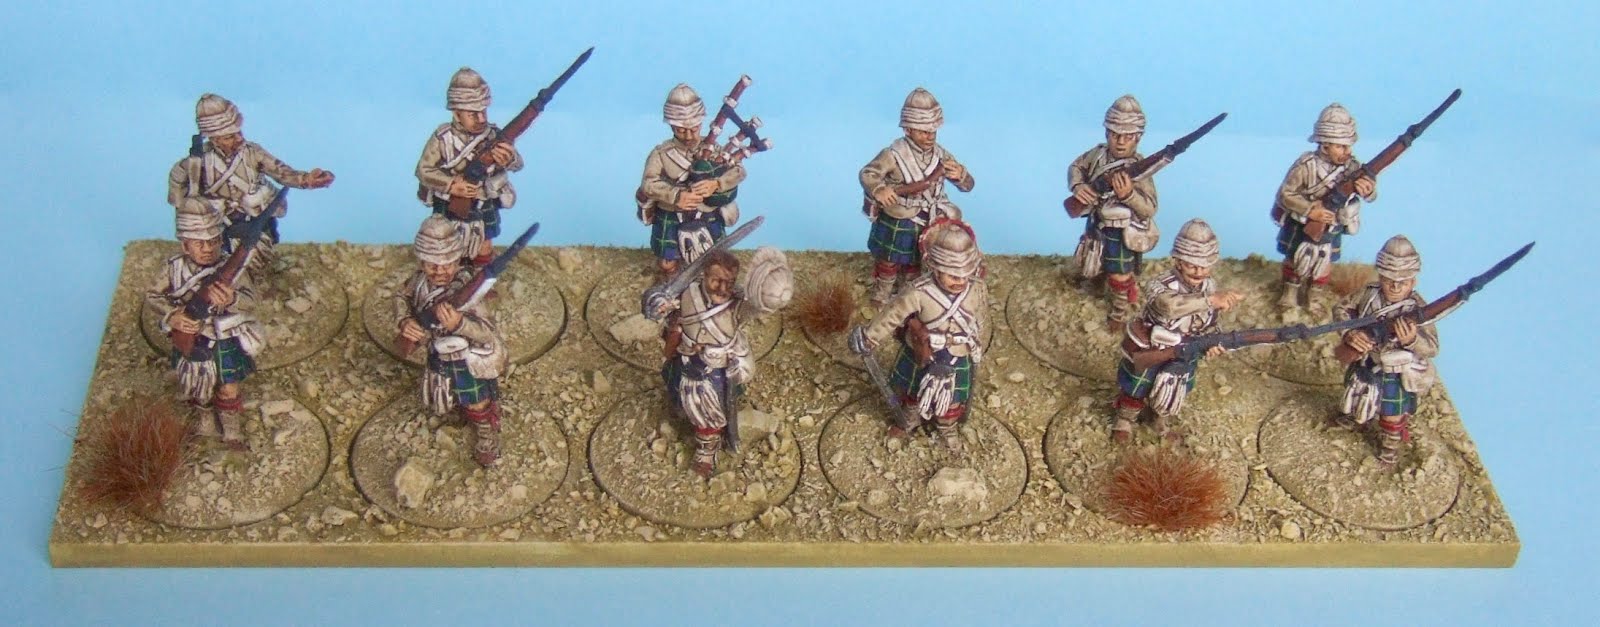
When ordering the Sikhs for my British Field Force from Perry Miniatures I decided to purchase a couple of packs of Highlanders from the Sudan range. These are lovely figures, the question was which Highland regiment to paint them as?

I stuck with my initial idea of raising a North-West Frontier themed Field Force (with some flexibility to use elsewhere) and so went with the 92nd (Gordon Highlanders) who fought in the Second Afghan War and the First Boer (and as the Gordon Highlanders in the Anglo-Egyptian War and Sudan). Uniform wise they are not right for the Sudan, they should have grey jackets but perhaps in the desert the grey was covered in a light dust and looked like khaki! :-)


The figures were painted using the same dip process I have used on all my British colonial figures, the only difference being the kilts painted subsequently. These are not 100% accurate, they should have three horizontal bars not two as I have painted, but my eye sight and painting skill isn't up to that level anymore and it looks ok.


North-West Frontier: Royal Horse Artillery 9 Pounder

I managed to finish off my Perry Miniatures 9 pounder in time for tonight's game of The Men Who Would Be Kings. A nice model and fairly easy to construct, though I was initially baffled with the bits for the seats and it took some time to hunt down a picture showing them clearly.


Jim at BIG was kind enough to donate a 60mm base to the cause, as the 50mm used for the Maxims was too small, and used this to mount the gun.